In this guide, I’ll walk you through the steps of downloading and installing VirtualBox on Windows, as well as setting up a desktop Linux virtual machine. We’ll also cover how to SSH into the virtual machine and effortlessly forward any running server to your host machine. By the time we’re finished, you’ll have a fully operational VM ready to serve as a generic development server.
You might be wondering, why use VirtualBox instead of an actual production server?
- Well, it’s totally free. No need to spend any cash to get yourself a server.
- You can play around with your VM as much as you want without worrying about breaking anything, and if things go wrong, you can easily roll back to a previous state.
- VirtualBox comes with a user-friendly GUI, which is perfect if you’re new to the world of virtual machines.
- it can serve as your personal experimentation lab and a gentle introduction to Linux and servers.
- In a way you can mimic a real production server, so you can practice and get a feel for server management tasks without any pressure.
Create and Configure a Virtual Machine
In this section, we will cover the essential steps required to set up and run your very own Ubuntu Desktop virtual machine.
Download and Install VirtualBox
To begin, we are going to download VirtualBox on our computer. Since this guide assumes you are running Windows, we will go with the latest Windows host.
After you click the link, follow the instructions for the download and installation process, and use the default settings.
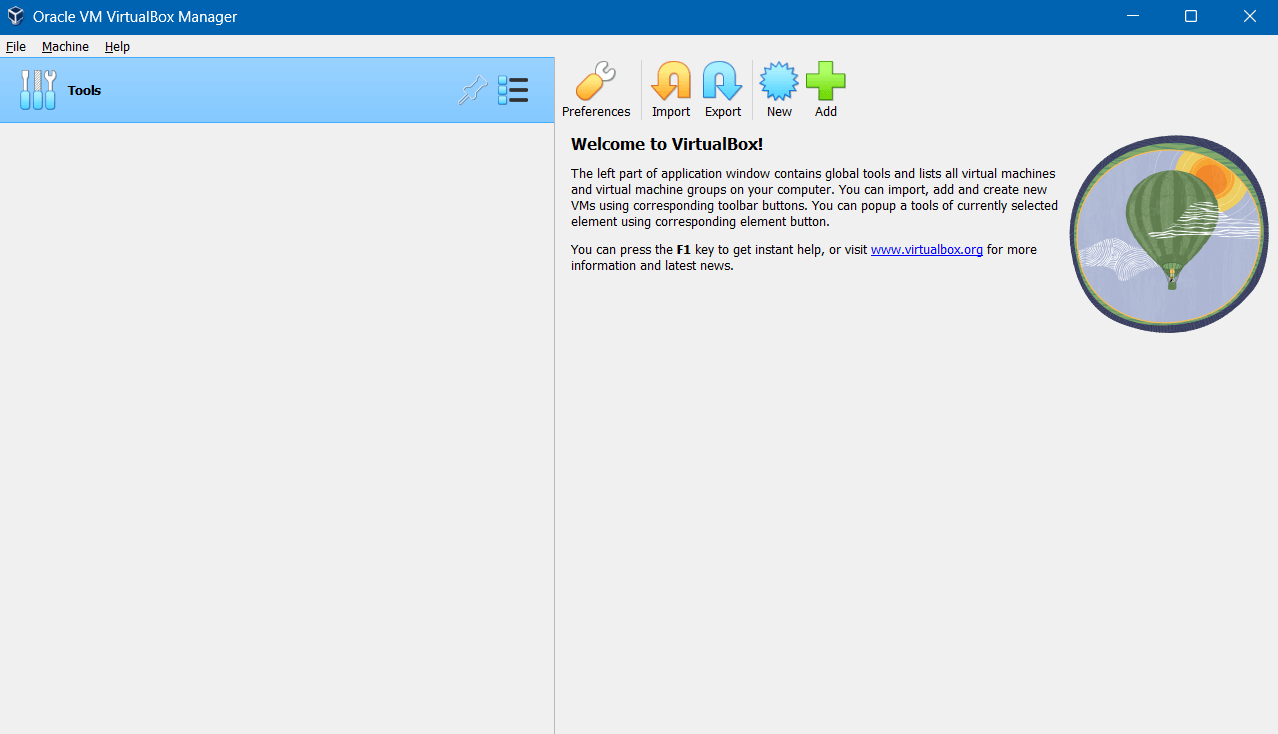
You should end up with the VirtualBox home screen, which should look something like this.
Download Ubuntu
Now, we need an operating system for our virtual machine. I am going to use Ubuntu Desktop 22.04.2 LTS, but feel free to choose any Debian based distribution.
If you’re opting for Ubuntu, visit the official website and download the latest version of Ubuntu.
Once the download is complete, we are ready to create our first virtual machine and mount the Ubuntu ISO image.
Create a Virtual Machine
Now that we have VirtualBox installed and our guest OS downloaded, we are finally ready to create our first virtual machine.
To begin, click on Machine > New button from the menu bar or simply press CTRL+N. This will display the following dialog.
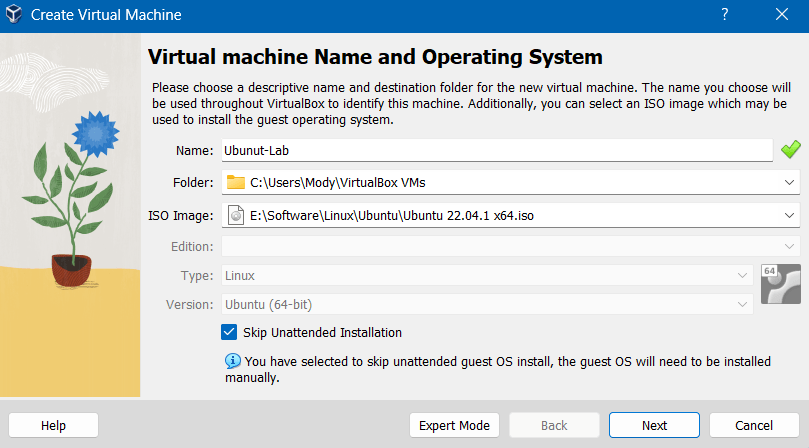
Give your machine a descriptive name that you can easily remember later. Next, browse and select the Ubuntu ISO image that we just downloaded. VirtualBox should automatically detect the type and version of the operating system we have chosen.
If this is your first time, I would suggest skipping the unattended installation option for now.
Now let’s move on to the next step by clicking Next.
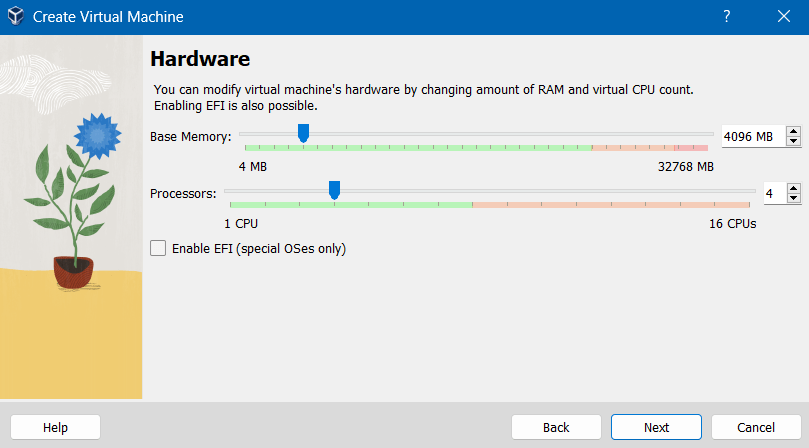
On this screen, we can specify the amount of memory and the number of CPU cores we want to allocate to our virtual machine.
Now, this all depends on what you intend to use your virtual machine for and the available resources on your PC. You don’t want to hog all the resources for your virtual machine and leave your Windows with nothing. Always ensure that you reserve enough resources for Windows and basic applications, and if you plan on running multiple virtual machines simultaneously, you should take that into consideration as well.
Personally, I would recommend starting with 4GB of RAM and 2 CPU cores. Don’t worry, you can always adjust these settings later if you feel that you’ve made a mistake.
On the next screen, we will create a virtual hard disk and assign the storage size.
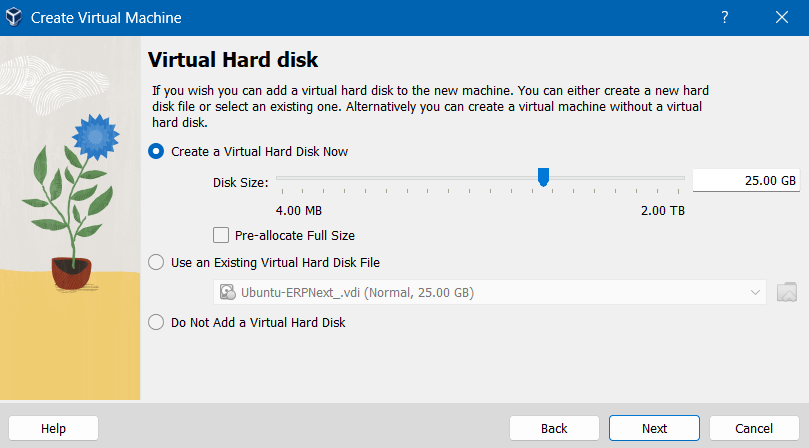
Pick the size of your virtual hard disk. Now, this is mainly based on your specific use case, but I’ll stick with the default value for now. Just keep in mind, adjusting the disk size later on isn’t as straightforward as changing the amount of RAM or CPU cores.
Leaving the Pre-allocate Full Size option unchecked will create a dynamic disk that grows as it gets filled up. It will only use the space it needs. On the other hand, choosing to pre-allocate the size will create a fixed-size disk that consumes all the allocated space immediately, even if you’re not using all of disk space. However, it tends to run a bit faster.
If you’re not worried about disk space, I’d suggest going with the pre-allocated size for that extra speed boost.
Finally, review your virtual machine info and click Finish to create your Ubuntu virtual machine.
Install Ubuntu
Now that we’ve successfully created our virtual machine, you should find it listed on the left side of VirtualBox home screen. The next step is to boot up our VM and complete Ubuntu installation.
To get started, you can either right-click on your VM and select Start or simply double-click on the VM name to initiate the boot process.
Once the machine starts, it will take a little while to load and then display the Ubuntu installation options. Choose the option that says Install Ubuntu.
After that, Ubuntu will guide you through a user-friendly setup process. We won’t cover the installation process in this guide, but usually, Ubuntu installs without any issues. Just remember that when you’re prompted with the confirmation to erase the disk, don’t be alarmed. It refers to the virtual hard disk we created earlier, not your physical hard disk.
Once the installation process is complete, your VM will automatically restart, and that’s it! You now have Ubuntu up and running on your virtual machine.
VirtualBox Guest Additions
You can skip this section if you’re not planning to interact with your Ubuntu system through the graphical user interface (GUI) and will solely access it via the command line.
VirtualBox guest additions is a set of software tools installed in the guest VM after the OS has been installed that greatly improve the guest VM performance and usability. They enable features such as drag and drop, shared folders, changing screen resolutions, copy-paste clipboards, automated logins, and much more.
You can check this guide out if that sounds interesting Enhancing Your Virtual Machine with VirtualBox Guest Additions
Update Ubuntu
It’s usually a good idea to update our system first before going through with anything. So, with your Ubuntu VM up and running, open a terminal window and run the following command:
sudo apt-get update && sudo apt-get upgradeThese commands will check for any updates and install them. When prompted for confirmation, simply type Y and press Enter.
VirtualBox Network
Before we go any further, let’s talk about how our VM connects to the network. There are a couple of common options NAT and bridge mode.
So, what’s the difference between them? That’s what we’ll quickly go over in this section.
Spoiler alert: We’re going with NAT! 😅
NAT Mode
Network address translation (NAT) is the default mode for any newly created virtual machine. This networking mode allows the VM to access the internet and other devices on the network, while remaining invisible to them.
This can be useful when trying to isolate the VM from potential attacks, or when there are limited IP addresses available.
However, NAT mode has some drawbacks. For instance, you cannot access your VM directly from your host OS unless port forwarding rules are set up on the host computer.
Bridge Mode
Bridge mode allows your VM to function as its own device on the network, complete with its own IP address. In this mode, your VM and host are on the same network. Each virtual machine is assigned a class C LAN IP address (i.e., 192.168.x.x), provided by the local DHCP server. This setup makes your VM accessible from your host and any other machine on the local network.
This is useful if you’re running services or applications that require direct network access, or if you want to mimic a real network environment.
However, bridge mode can also present some challenges. For instance, your VM is exposed to the same security risks as other devices on the network.
Access Server Running on localhost within Guest OS from Host OS
Now that we have our Ubuntu VM up to date, let’s consider a scenario where you have a local service running on your VM’s localhost. Suppose you want to access that service from your host OS (Windows).
For instance, if you’re running an Express server on your VM using port 5000, within your Ubuntu system, you can easily access it through the URL localhost:5000, and it should work fine. However, if you attempt to access the same URL from your host OS (Windows), it won’t work. So, in this section, we’ll cover how to resolve this issue while using NAT mode.
Find the Guest OS Local IP Address
There are several ways to check private IP addresses in Linux. The simplest method is the Linux ip addrcommand.
ip -4 addrThis command displays both the loopback address (127.0.0.1) and the actual private address of the machine.
Use the following command if you want to get only the IP address of the system.
ip route get 1.1.1.1 | awk '{print $7}'Alternatively, you can use the hostname command to get the IP address.
hostname -IPort Forward from the VirtualBox Settings
Now that we have our VM’s private IP and our imaginary Express server running on port 5000 within our guest OS, we can move forward.
The next step is to enable port forwarding from the host OS’s localhost to the guest OS by connecting 127.0.0.1:5000 to 10.0.2.15:5000 in the VM’s network settings. This configuration will redirect calls made to localhost:5000 in the host OS to 10.0.2.15:5000 in the guest OS.
In your VirtualBox home screen, right-click on your VM name and select Settings. From the navigation menu, select the Network tab.
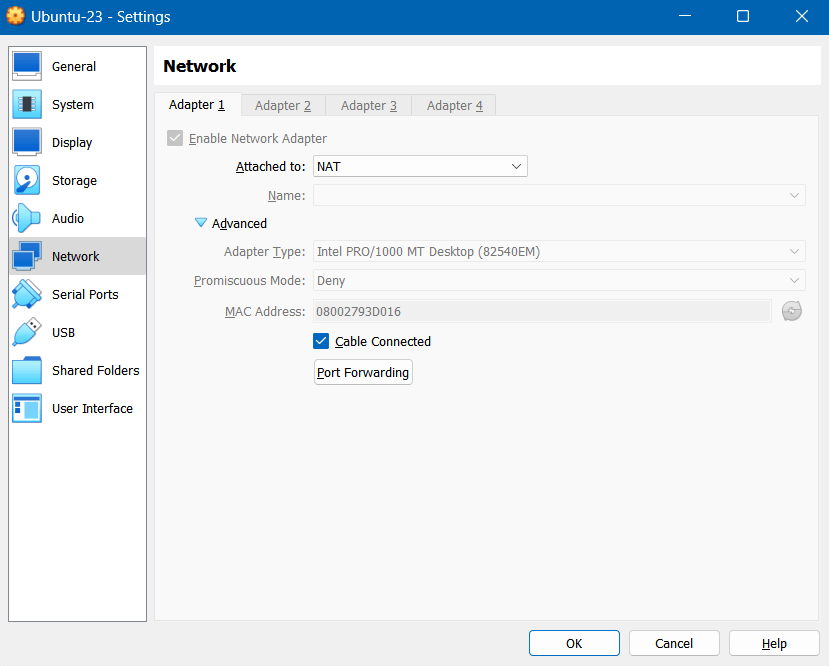
Next, expand the advanced dropdown and click on the Port Forwarding button to open the port forwarding dialog.
In the right sidebar, click on the + icon to create a new empty port forwarding rule. Let’s fill in the following fields.
Name - The name you would like to give this rule. Choose a name that makes sense to you.
Protocol - Leave the default protocol as TCP.
Host IP - This is the host private IP address, which should be 127.0.0.1 or localhost.
Host Port - Choose the port you want to access the Express server from. For instance, if we used port 3000, this is how we should access our server localhost:3000.
Guest IP - Our guest OS’s private IP we acquired earlier. In my case, it’s 10.0.2.15.
Guest Port - The port on which our Express server is running on within our guest OS. In my case, it’s port 5000.

Confirm your changes to apply the port forwarding rules. Now, you can access your local Express server, which is running in your Ubuntu VM, from your host OS (Windows) using the URL localhost:3000.
SSH Into Ubuntu Virtual Machine
So far, we have heavily relied on the GUI. But what if you want to simulate a real production server and interact with your server using the command line? By doing so, you won’t even need to use the GUI, and you can start your VM in headless mode.
In order to SSH into your server, the server must be running an SSH server and the SSH service is enabled. This will allow you to remotely connect to your server using SSH.
Installing SSH on the Virtual Machine
To set up an SSH server, we will install OpenSSH.
First, make sure your Ubuntu VM is booted up (if it wasn’t already) and open a new Terminal window.
Use the following command to install OpenSSH.
sudo apt install openssh-serverOnce installed, your SSH server should start up automatically. You can check its status by using the following command.
sudo systemctl status sshIf the SSH service is not running, you can start it manually using the following command.
sudo systemctl enable ssh --nowOpen SSH Port in Firewall
If you have a firewall enabled in your Virtual Machine, it may block your SSH connection. You can check which ports are open using the following command.
sudo lsof -i -P -n | grep LISTENIf you do not find port 22 among open ports, we need to manually open it in the firewall.
sudo ufw allow ssh
sudo ufw status verbose
Configuring VirtualBox Network
Similar to what we did to access a local server running in the VM, we need to use VirtualBox port forwarding and the default NAT adapter that our VM is attached to. As we discussed earlier, NAT mode enables the virtual machine to access the internet but prevents other devices from accessing it.
In your VirtualBox home screen, right-click on your VM name and select Settings. From the navigation menu, select the Network tab.
Next, expand the advanced dropdown and click on the Port Forwarding button to open the port forwarding dialog.
In the right sidebar, click on the + icon to create a new empty port forwarding rule. Let’s fill in the following fields.
Name - The name you would like to give this rule. Choose a name that makes sense to you.
Protocol - Leave the default protocol as TCP.
Host IP - This is the host private IP address, which should be 127.0.0.1 or localhost.
Host Port - We will be using port 2222 for the host port.
Guest IP - Our guest OS’s private IP we acquired earlier. In my case, it’s 10.0.2.15. If you skipped this part, you can see how to retrieve your VM private IP here.
Guest Port - We will use port 22, which is the default SSH port, and we have verified that it’s not being blocked by the firewall.
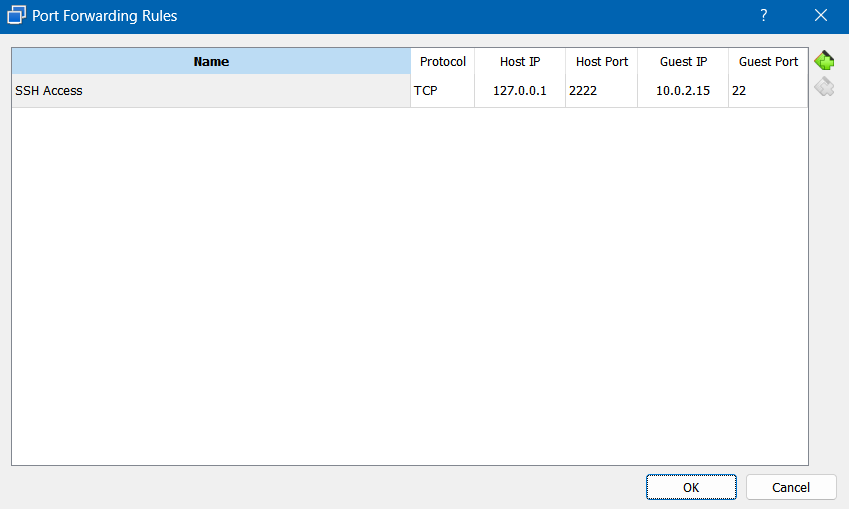
Press Ok to confirm your changes.
You might need to log out of your virtual machine for the changes to take effect.
Establish SSH Connection
At this point, you can try logging into the server from your host OS (Windows).
Open your terminal in the host OS and run the SSH command to establish the connection.
ssh -p 2222 guest-user-name@localhostReplace guest-user-name with your Ubuntu VM username, which is the username you created during the Ubuntu installation process. Finally, you will be prompted to enter the password, use the password for the guest OS to establish the connection.
That’s it, you don’t have to interact with your guest OS GUI anymore. Obviously, you need your VM up and running to establish a connection, but there’s no need to use the GUI.
To start your VM in headless mode, simply right-click on your VM and choose Start > Headless Start. This will initiate the boot process of your VM without displaying a screen.
Conclusion
We’ve covered the steps to set up a virtual machine on VirtualBox, how to access a local server running on your VM, and how to establish SSH access to your VM. Of course, these steps might not fit exactly what you need, but hopefully, the concepts we’ve discussed can help you create your ideal development environment.
For instance, you can install and configure web servers like Apache or Nginx, set them up to serve web pages, set up a database, or install any other software you might require. Once you’re happy with the setup, you can start deploying your web applications and use them on your host OS.